When we started designing our outdoor kitchen, we knew British winters wouldn’t go easy on it. Rain driving sideways off the Atlantic, patio slabs slick with algae by mid-January, and the occasional frost cracking whatever it fancies—if you’re in the UK and you want your outdoor kitchen to work year-round, you’ve got to build it like you mean it.
This post walks you through exactly how we did it: from the concrete base up to the roof and the frost-proof plumbing beneath it. Whether you’re just thinking about starting or you’re halfway through a garden kitchen build, this’ll give you a practical blueprint for doing it once and doing it right.
Why an Outdoor Kitchen Is Worth It (Even in the Cold)
Let’s start here. Most people think of outdoor kitchens as a summer luxury. But built right, it becomes another room—usable 10 or even 12 months of the year. Ours gets used on winter weekends for roasts, pizza nights under the heater, even just sitting out with a mug of something warm. The trick? Design with February in mind, not just July.
Step 1: Lay a Solid, Sloping Foundation
We started with a 100 mm thick reinforced concrete slab laid over compacted Type 1 MOT. That’s the backbone—strong enough to support even the heaviest grill and fridge combo, and resistant to frost heave, which is when trapped water freezes, expands, and wrecks your base.
We gave it a gentle slope—1:80 fall—so water doesn’t just sit and soak into joints. Instead, it rolls off into a channel drain along the front edge. That little fall makes a big difference when you’re trying to avoid black ice or green slime come January.
Step 2: Plan Drainage Like You’re Expecting a Storm
Drainage is where most outdoor kitchens fail over time. We dug a French drain (basically a gravel-filled trench with a perforated pipe) that takes water away from the patio and into a soakaway. We also laid the patio using porcelain slabs on raised pedestals—great for drainage, and they’ll never go green or slippery like sandstone.
Remember: if you let water pool, it’s going to freeze. And when it does, it’ll crack grout, pop tiles and leave you with an outdoor kitchen that looks tired before spring even arrives.
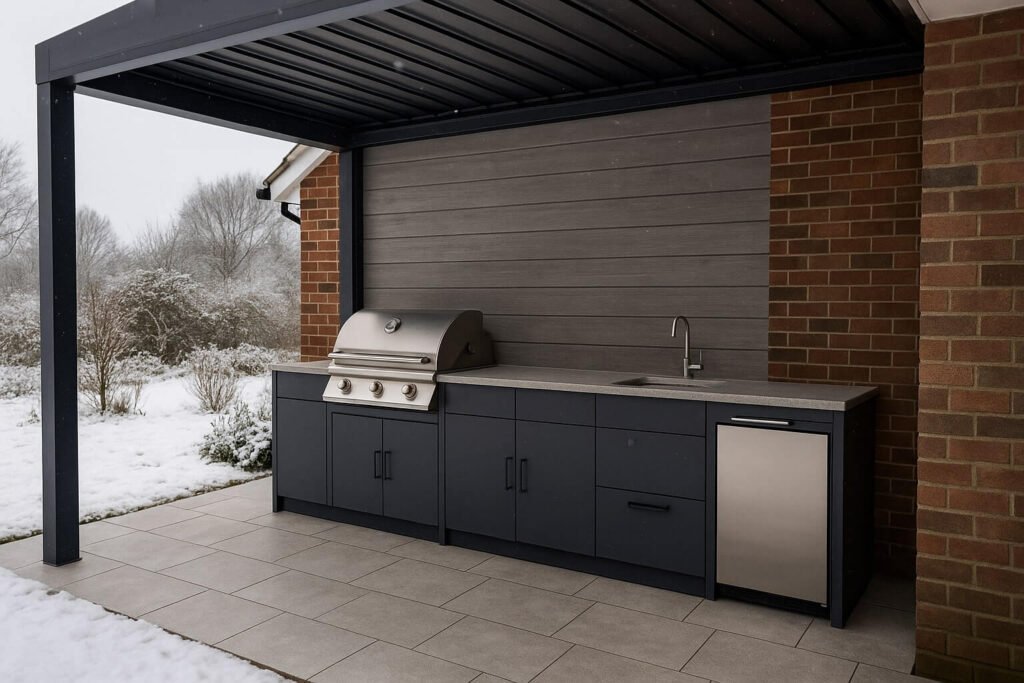
Step 3: Shelter Is Everything
We built a powder-coated aluminium pergola with adjustable louvre blades overhead. It’s tough enough to handle snowfall, doesn’t rust, and those blades can tilt open to let smoke out or close tight when the heavens open.
Even if you’re not going for a full roof, some kind of overhead protection—an awning, a cantilever, even a lean-to off the garage—can make the space usable in shoulder seasons.
Bonus tip: install some infrared heaters up in the beams. We went for a 3.5 kW model and it cuts through the chill like a good cuppa.
Step 4: Use Materials That Don’t Mind the Cold
For cabinetry, we went with marine-grade HDPE units. These things are built to take abuse—UV rays, rain, frost, salt spray. They don’t swell, don’t fade, and won’t corrode. If you’re coastal, that’s essential. If you’re not, it’s still smart.
Inside the structure, we used aluminium framing and A4 stainless fixings. Lower grade steel will tea-stain or rust after one wet winter.
The worktops are 20 mm porcelain slabs with a slip rating of R11—frost-proof, stain-proof, and as sleek as anything you’d find in an indoor kitchen. No sealing needed, ever.
Step 5: Get the Utilities Right (Especially Water)
This is where you’ve got to think ahead. We ran 25 mm MDPE pipe buried 600 mm deep to stay below the frost line. It’s got a trace-heated isolation valve so we can shut the water off and drain it down before the coldest weeks. That alone has saved us from burst pipes more than once.
Power comes in via SWA cable from a fused spur off the house, fitted with an RCBO. It’s IP65 rated, so no drama when the rain comes sideways.
Gas for the grill? If you’re going plumbed, make sure the installer’s GasSafe and follows the IGEM trench depth rules—minimum 325 mm deep for soft ground, 450 mm for hardstanding.
Step 6: Choose Appliances That Can Handle the Weather
Stainless steel is the way forward—but not just any stainless. Go for 316 marine-grade, not 304, especially if you’re anywhere near the coast. It holds up beautifully and won’t pit or stain.
Our built-in BBQ is 316, as is the sink and tap. The fridge is outdoor-rated, but we still empty and unplug it from December to March, leaving the door propped slightly open to prevent mould.
Oh, and don’t forget: anything with a power plug needs an IP-rated socket and a good outdoor cover. Cheap fridges die quick in British winters.
Step 7: Make It Look Good All Year
One of the easiest ways to ruin the vibe of an outdoor kitchen is letting algae and dirt take over. That’s why we chose colour-fast porcelain and powder-coated finishes. They wipe down quick and don’t go blotchy or mossy when the sun disappears for four weeks straight.
Lighting makes a huge difference too. We tucked in some IP65-rated LED uplights around the beds and strip lighting under the counter lip. Even on a grey day, it looks intentional—like a proper extension of the house.
Step 8: Stay on Top of Maintenance
We do a quick once-a-month routine, even in winter:
- Wipe the counters
- Rinse the drain channels
- Empty the grease trap
- Give the grill a cover check
- Wash down the cabinet faces
Takes 20 minutes, tops. But it keeps the whole space feeling fresh, usable, and not like a forgotten campsite kitchen.
Budget Breakdown
Here’s roughly what we spent for a 6-metre run with a pergola and mid-range appliances:
| Item | Cost |
|---|---|
| Concrete base & drainage | £3,500 |
| Aluminium pergola (motorised) | £6,000 |
| Cabinets (HDPE) | £8,000 |
| BBQ + sink + fridge (316) | £4,500 |
| Porcelain worktop | £2,200 |
| Utilities (water, gas, electric) | £2,800 |
| Total | ~£27,000 |
Not cheap, but it adds a full extra “room” to the house—and it works year-round.
Would We Do It Again?
Absolutely. Our outdoor kitchen has become one of the most-used parts of our home, especially in the shoulder seasons. It’s not just for summer barbecues. It’s for crisp autumn lunches, New Year’s Eve nibbles, and even Valentine’s Day dinner under the stars (with the heater cranked).
If you’re planning your own outdoor kitchen, start with durability, add proper drainage and shelter, and pick materials that won’t throw in the towel at the first frost. Do that, and it’ll stay looking sharp all the way through February—and for years beyond.